- [email protected]
- Fayetteville, Georgia
Producing Your Book - Part 1
Offset Printing
I Need ONE More Page ... Why Do I Have to Add EIGHT?!!
Okay, here’s one for you ...
There was a time in my life when you could ask my husband, “What does your wife do for a living?”
He would answer, “Oh, she climbs up on a light table and STRIPS!!”
You know, there might come a day when I look back at some of the things I’ve written in these articles, and I’ll ask myself, WHY??!
But not today ... ‘cause it’s true!! Yes! The nice lady with the rambunctious pony, who wants to draw pretty pictures for your sweet children ... used to strip for a living! If you ever meet me in person, you’ll likely think, Good thing she gave that up! But that’s not the reason I quit. And just in case I’m about to get into real trouble ... no, it’s not that kind of stripping! You’d better be relieved!!
The reason I quit was because of technology. Progress. Time marches on, the world revolves, and everything is so different than just a couple of decades ago. Including the printing industry.
We’ve lost a lot in the way of craftmanship. There aren’t too many people left now who have the skill to hand letter with a brush. My husband, who is a structural engineer, says he misses the days when he could look at a set of drawings and know which draftsman drew them.
But we’ve gained a lot, too! Twenty or thirty years ago, your full color flyer for a special church event would have only been one color. If you were wanting to self publish a full color picture book, you would’ve been mortaging your home, car and first-born to be able to afford it. Not so anymore. So let’s take a look at what a print shop – offset or digital – actually does to produce a physical book.
No matter whether you are self-publishing or if a traditional publisher has bought your book, some print shop somewhere will be printing it. Generally speaking, though not always, traditional publishers will be using offset printers and self-publishing houses will be using digital printers. Perhaps you are totally going it alone and will be negotiating with a printer yourself. Let’s see how each shop will physically produce a book, what the differences are and the advantages and disadvantages of each. And my explanations won’t be overly detailed, technical, or scientific – I’m not likely going to impress my printing industry colleagues – but hopefully this will help you understand the production process of producing a book just a bit better.
I am assuming in these articles that the digital press can handle 12”x18” paper and the offset press will take a 19”x23”. There are larger and smaller presses, but these sizes are standard in most small shops that you will be dealing with.
And “digital” means “laser printer”, which uses dry toner that is fused to the paper with heat (The old newspaper term “hot off the press” should take on new life!). There is also “inkjet” printing, which is mostly used in large format printing for banners, posters and fine art reproductions called giclees. It’s not very economical for large runs partly because of the ink, but also because it is much slower. But who knows? That might possibly change in coming years, too!
Offset Printing
I don’t know if there is snobbery in the printing universe. If it exists, I suspect it would be on the offset side, rather than the digital side. I can picture an offset printer thinking that he is the real printer! Offset printing came first after all. Offset uses wet, actual ink. Ink that can be used right out of the can or mixed to make any color needed. While plastic or paper plates can be used for shorter runs, high quality offset printing uses metal plates (zinc, steel or aluminum) to transfer the inked images to a blanket that then “offsets” the image to the paper. Color, registration and image quality on an offset press is superb. Thousands and thousands of imprints can be made in a single run and will all be sitting in the exact same place on the paper and will all look identical on every page. Offset can easily put digital printing to shame. All thanks to those wonderful, immovable plates.
Let’s outline the basic offset process, from art to printed image ...
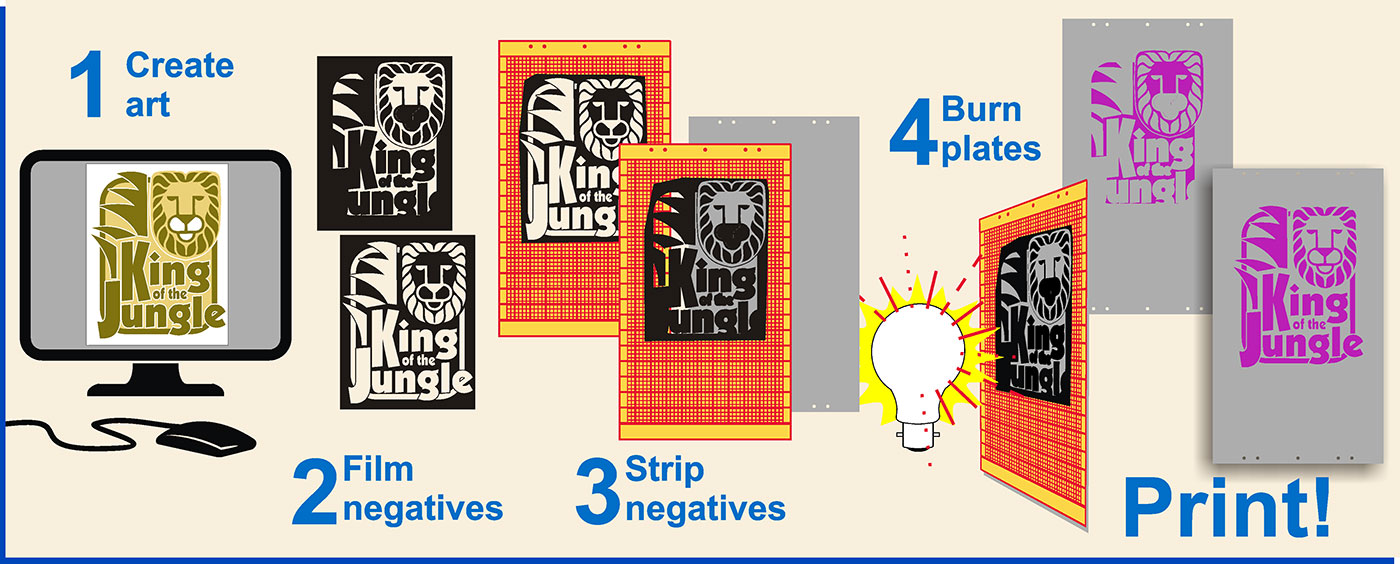
- Art is created with typesetting and images ... on computers nowadays, thank goodness!
- A camera shot is taken of the art, and a film negative is developed. One negative for each color. This was once done with a room-sized camera and a darkroom. If your layout included a full color photo or painting, the 4 negatives for the cyan, magenta, yellow and black were created by taking 4 separate scans of the full color art on a drum scanner. Each scan was filtered through a different filter, so that one scan would just capture the cyan. The next scan would use a different filter to just capture the magenta. Then just the yellow. And finally the black. This explanation is greatly over simplified ... the process took lots of skill, hand labor, and all the special equipment needed, and this was a big part of the reason four color process was so expensive. Today, the computer software will do all of this for you. And instead of a camera, today we have image setters, which are specialized printers that will print onto clear film and give us nice dense film negatives.
- Then the negatives are “stripped” onto masking sheets. A masking sheet is a printing-plate-sized, goldenrodyellow paper with a printed grid. Using a light table and the grid for alignment, the negatives are taped into proper position on the back of the sheets. Openings are cut in the paper from the front to expose the image areas of the negative. You will need a masking sheet with an appropriate film negative for each color that will be printed, and they will have to be “registered” or aligned perfectly with each other.
- Each masking sheet with film is then aligned on top of an unexposed plate, which has a type of photoemulsion coating on it. Both are placed into a vacuum frame to get perfect contact, exposed to a special bright light which will expose the plate emulsion through the clear areas of the negative. The unexposed emulsion will be washed away, and you have a plate with an image “burned” onto it, ready to go onto the printing press. This will be done with all of the masking sheets, a plate for each color to be printed.
Now we can go through this whole process and just print one letter-size page. But let’s be more efficient than that with a larger press, plates, masking sheets. Let’s print an 8 page booklet, 8.5”x11”, and let’s do it as efficiently and as economically as possible ...
Signatures
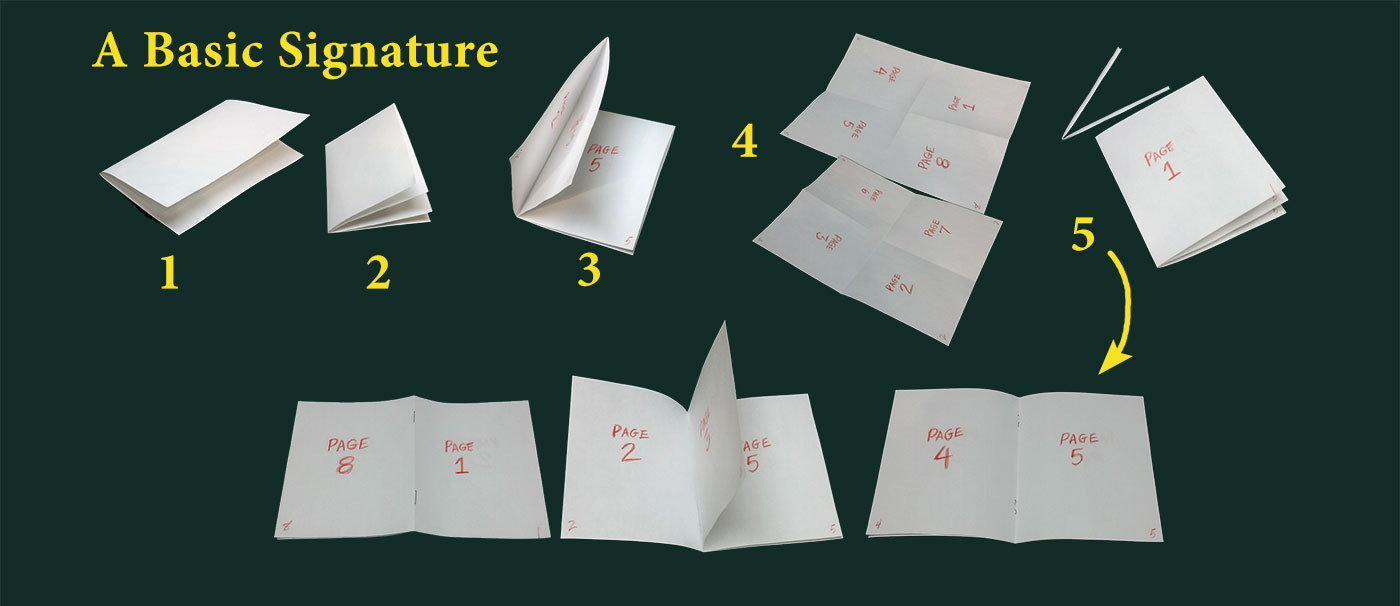
A picture is worth a thousand words ... and if you’ll take it a step further, get out some paper and literally follow the instrucions below, you will likely understand even better ...
- Fold a blank letter-size piece of paper in half.
- Fold it in half a second time.
- Number your folded pages, 1-8.
- Now unfold your paper and smooth out the folds ... in the printing world, this is called a signature. A signature is printed on both sides of the paper. Pages 5-4-8-1 will print on one side. Pages 3-6-2-7 will print on the reverse side. Note that when these are laid out flat, Pages 4 and 5 are the only 2 consecutive pages that seem to be in the right space ... because on an 8-page signature, Pages 4 and 5 will be the center spread. When we have all of our negatives ready to strip onto the masking sheets, we can use our little “dummy” signature to tell us where to position each negative/page.
- When printing is completed, the paper is folded like above. The top folded edge is trimmed away. The folded edge is saddlestitched – stapled – and, voila! We have an 8 page book!
But we’re doing a children’s book ... we need 32 pages! How’s that going to work? Glad you asked!
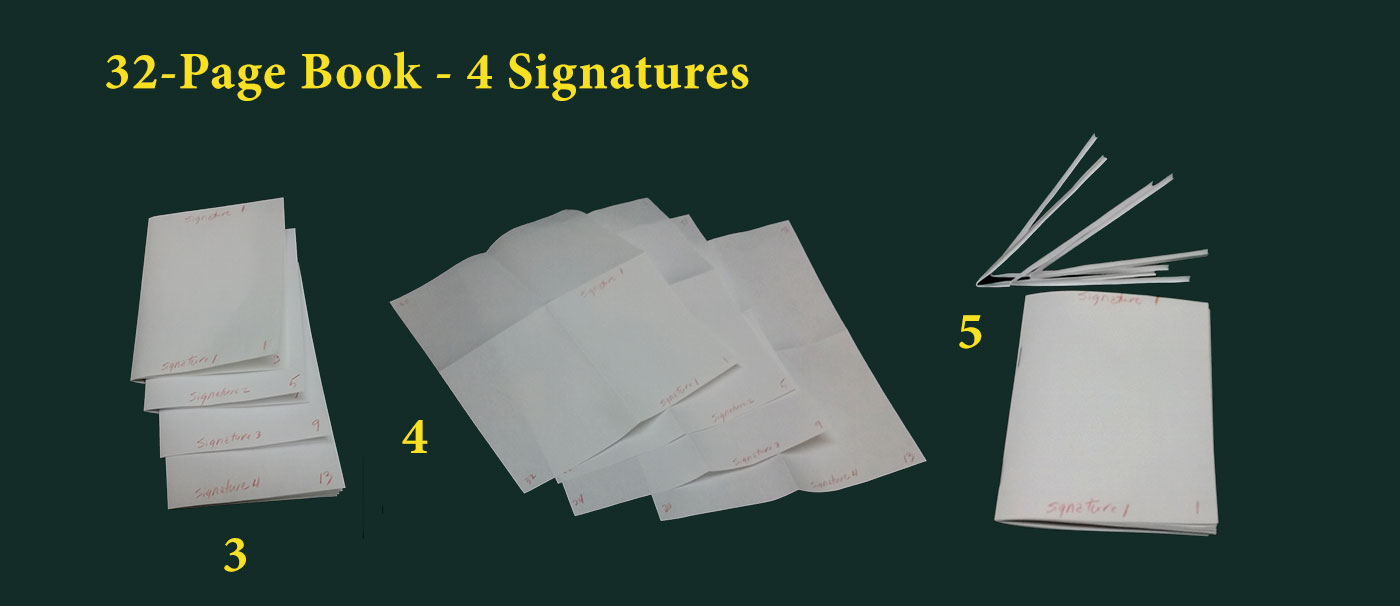
8 page signature ... 32 pages needed ... 4 signatures! (I know ... I’m a math genius ... be in awe!)
- - 2. Follow steps 1-2 above with 4 pieces of paper.
- Nest the 4 pieces together before numbering the pages. If you’ve done it correctly, Signature 1 will begin with Page 1. Signature 2 will begin with Page 5. Signature 3 will begin with Page 9. Signature 4 will begin with Page 13.
- Unfold your paper and see which pages sit beside which pages. It looks crazy, but is actually very logical if you study it closely. Note that with 4 signatures, 32 pages, the center spread is now on Signature 4, Pages 16 and 17.
So we’ll get the masking sheets out again and strip the film for our pages, using our dummy mock up to show us the page positions, front and back, for each signature. - So the printer will print the four signatures, front and back, as laid out here in our little dummy book. He will fold them and nest them together in the same order we did above, trim away the top fold, and saddlestitch ... we have a 32 page book!
Of course, most picture books are not saddlestitched, they are perfect bound with a softcover, or glued and wrapped with a nice hardcover. So instead of folding the paper, the paper is trimmed down into separate pages, the pages are collated in the right order, then they are glued or stitched together and the cover is added. We’ll talk about covers in a Producing Your Book – Part 3, but for now, this is the basic process an offset printer will use to print the inside pages of your book.
Sometimes, when laying out a book, you discover you really need another page or two. Or perhaps you have 3 pages too many. But your printer or publisher will tell you no, you will need to add or subtract page counts in multiples of 4 or 8. And these signature layouts are the reason why.
Signatures, Paper & Page Sizes
If each finished page for our book is 8.5”x11”, and we have 2 pages side by side, plus another 2 pages above that, we need to be printing on at least a 17”x22” size paper. If we have to allow for bleeds – where art extends past the trim area, to appear to be printed to the edge of the paper – or special folds or trims, the pages will need to be spread apart on the masking sheet adequate amounts to accomodate those ... then the paper size will need to be larger. We also have to allow for a 1/4” gripper edge, which is the space needed for the press to “grip” the paper to pull it through the press. So no printed images can be in that area. So our paper may need to be 19”x23”, or whatever a standard sheet size is for printers, to accomodate all these extra areas
We’ve been talking about 8-page signatures, 4 pages each on 2 sides, to get 8 pages per sheet. But we can get a larger press and larger paper – or a smaller page size – and print 16-page signatures, 8 pages each on 2 sides, to get 16 pages. Or print a book with pages half letter-size, print on the same size sheet we’ve been using, and print a 32-page signature, 16 pages each on 2 sides to get 32 pages on one sheet.
But there are other considerations that will affect how the signatures are set up besides just press, paper and page dimensions.
Signatures and Paper Grain
Did you know that just like fabric, paper has a grain? Both a long grain and a short grain? And that grain has a really big influence on how the paper travels through the press and how well it will fold and cut. For this and economical reasons, most offset shops purchase their paper in larger sizes and cut it down to the size they need to run through the press. Sometimes when ordering paper they need to specify to the supplier which direction they need the grain to run. If the finished page length or width needs to run with the short or long grain, because it will need to fold in one direction or the other, that will affect how the signatures can be arranged. Generally, signatures will be arranged and run like we demonstrated above. In special circumstances, the signature layout may need to be rotated 90 °. You might not be able to print so many pages on one signature and the layout won’t be so economical.
These considerations will have a very important impact on the number of pages in a book. Particularly when, in order to keep costs low and consistent, the printer and the publisher have agreed on a set template for running the publisher’s books. Any variance away from the standard template will add extra cost to set up and production.
So while you might be thinking, What’s the big deal? I only need one more page, you will likely be told, No! Or, if they do tell you, Yes, you will be instructed to add four to eight pages (depending on the signatures they are using and how they set up and run the extra pages) and they will likely charge you substantially for your “special circumstance”. Because not only is the regular routine for the press disrupted, there will be more resources used, including time, material and labor. The bindery department that assembles the book will be affected also.
When beginning to plan and lay out your book, you or your graphic artist and/or illustrator need to find out up front what the parameters will be concerning page counts. No drawing or typesetting or layout should ever begin before knowing page dimensions and page count requirements.
Even if you are going totally solo, not using a self-publishing company, and negotiating directly with the printer, find out up front what the parameters will be. You want to get the best possible price you can get from him, and the more streamlined and efficiently he can produce your book, the less headaches your printer will have and the more cost-effective it will be for you. That means no weird, out of the ordinary page counts, like 33. Or off-the wall page dimensions, like 8.75” x 11.25” instead of 8.5”x11”.
How Many Books To Print?
There’s a lot of set-up when printing a job with offset. Computers and image setters have helped to streamline the process, but there is still the need for stripping film, burning plates, setting up the press with plates and ink, etc. All of this cost will be reflected in what your printer charges you. It will take just as much time and labor for set-up to run 100 books as it will to run 10,000 books. And that will greatly affect your bottom line when you are trying to price those books to sell. So when you are offset printing books, print the largest quantity you can possibly afford. The more books you print, the less cost per book you will have, and that will mean affordable pricing to sell your books.
In Producing Your Book – Part 2 we’ll continue this discussion and delve into digital printing.