I’ve talked before about ugly babies in other blogs and articles. An ugly baby is that self-published book which is not quite professional enough. It looks okay, but it's just not great. Perhaps the author was a do-it-yourselfer who didn’t quite have the budget for professional typesetting and layout. They’ve got a graphics program on their computer ... how hard can it be? And look at how much money they’ll save!
Self-publishing a picture book is akin to doing your own plumbing or making your own clothes ... sure, you can handle it to a point, but you need to know your own limits. For the bigger, more important jobs, it’s time for help or training from a qualified professional. Otherwise, guests and friends know without being told ... you did that job yourself.
Potential buyers/readers of your book can see it, too. While your friends will likely be cautiously polite about what they really think of your homemade shirt or newly installed sink, those readers will let you know with their wallet what they think of your self-published book!
When you publish a book, you are manufacturing a product which you want people to buy. That book needs to be just as professional and top-quality as you can possibly get it.
One of the quickest ways to make your picture book scream, I am homemade! is to do a really lousy job selecting and laying out the text in your book.
But heads up, all you self-published children’s book authors, because the reverse of that is true, also ... one of the quickest ways to improve the quality and shelf-appeal of your book is to do a really terrific job of selecting and laying out the text in your book.
I’m not talking about the actual story/manuscript which I’m sure has been written and rewritten and poured over and proofed and edited many times ... of course you want a well written narrative. No, I’m talking about the actual printed copy that is sitting beside the illustrations in your book.
If it's not presented well, it will never matter how fabulous, important, enlightening or entertaining your content is. Whether you are laying out your book yourself, or hiring someone for that, you need to learn about this important element of your book – the typography.
Typesetting Basics
There was a time, not so long ago, when typesetting terms were only heard in the production rooms of printers, magazines, newspapers and publishers. Thanks to technology, today anyone with an email address and a version of Word on their laptop is familiar with selecting and sizing type.
Still, if you're an author simply trying to publish a story, it can get confusing when the publishing and graphics folks you're interacting with start talking to you about points and picas, leading, kerning and justification. So here's a brief explanation of the basics. These terms can also be found in my Glossary. Let me know if you run across others I've overlooked and I'll add them.
• Fonts and Typefaces
These 2 terms are commonly used interchangeably to just refer to a particular letter design, but they actually mean different things. For the purposes of this article, here are my definitions:
A Font, or, more correctly, a Font Family, is an overarching term referring to a specific design. For instance, Times Roman and Arial are 2 different fonts.
A Font can fall into 4 basic categories:
1. Serif Fonts have small flourishes added to the ends of the strokes.
2. Sans-serif Fonts have clean endings on their strokes and do not have the small flourishes added.
3. Script Fonts are the flowy styles used on invitations. These look handwritten and can be very formal or very casual.
4. Novelty/Designer Fonts are the unusual and off-beat ones that don't fit into the other categories. Sometimes they look hand-drawn or built out of odd shapes, like lettering that looks like wood or is filled with flourishes to make it look like a circus, or the old west, or bubble lettering, etc.A Typeface refers to the particular version of the font.
For instance, if the font is Times Roman, the typeface could be Times Roman Regular, or Times Roman Bold, or Times Roman Italic.
Most fonts will have the standard typefaces of Regular or Normal, Bold and Italic. Some will have even more. On my computer, for the Arial font, I can also choose Arial Black, Arial Narrow, Arial Rounded, etc. ... all varied versions of the same style letter. Different font families will have more or fewer typefaces available.• Sizing and Measuring Type
Type uses it's own measuring system: points and picas.
There are 12 points in a pica. Points are used to measure the letter's height, from the top of the ascenders (the stroke above the main body of a letter, as in the letters: b, d, h, k, etc.) to the bottom of the descenders (the stroke below the main body of a letter, as in the letters: g, j, p, y, etc.)
Thus, 12 pt. type is 12 points tall; 30 pt. type is 30 points tall; etc.
For reference, the smallest type on the address lines of a standard business card, is usually 8-10 points tall. The headlines on a newspaper might be 24-30 points tall.Picas are used to measure the length of a line of type, though most graphics people will measure in inches. There are 6 picas in an inch, thus 72 points in an inch. To get precise measurements and avoid fractions of an inch, points and picas are the way to go. For instance:
- a line of type 7" long = 42 picas
- a line of type 5 3/4" long = 33 picas, 18 pointsLet's go the other way:
- a line of type 25 picas, 13 points long = 4.1967592593"!Avoiding problems like that is the reason this measuring system was developed. The software we use today figures all this out for us, and we tend to just measure text frames and margins in inches. But if you ever find yourself working with an old-school printer, this is what's he's talking about!
• Line Spacing
In a line of type, the bottom of the the main body of the letters sits on the baseline. Descenders drop below the baseline and ascenders rise above the main body of the letter.
The spacing between lines of text is called leading, It is the measurement between a line of text's baseline to the next baseline of the next line of text.
If you've only used word processing programs or standard text software, you've likely not heard this term. Basic typing programs just call it "line spacing" and use the measurement of the text ... it you're typing 12 point text, the program will give you 12 point line spacing or leading. If you use 18 point text, it will give you 18 point leading.
The designers and graphic artists who typeset and layout your book will use graphic programs like Illustrator or InDesign. These programs allow the designer to adjust the size of the leading in his text independent of the size of the text. They can make the leading as tight or as open as they like, depending on the look they want and the readability they need.
The best general rule is for leading to be a few points more than the point size of the text. This will open up the text a bit and improve readability. For 12 point text, maybe use 13-15 point leading. But there are no hard and fast rules ... it all depends on the selected font, the design of the layout, how much space is available for how much text, etc. Just know that the leading between lines of text is adjustable, and that it can affect the look and readability of your text.
When specifying in written notes to your graphic person sizes and measurements of text and leading, write it like this: the point size of text over the point measurement of the leading. For example, 12/14, means 12 point text with 14 point leading.
• Alignment and Kearning
There are 5 choices for aligning the sides of your text:
1. Flush Left
2. Flush Right
3. Centered
4. Justified
5. Forced JustifiedConsider the overall design and feel of your pages when deciding which alignment is right for your layout.
Flush Right or Flush left are vertically aligned on the one specified side. They are generally a bit more informal, and are the easiest choices for avoiding spacing issues. The copy on this web page is Flush Left.
Centered is mostly for poetry, headlines and captions. If can be an interesting choice for body copy in the right kind of layouts.
Justified is vertically aligned on both sides. It is a bit more formal and is typically what you see in chapter books, printed magazines and newspapers.
Forced Justified is vertically aligned on both sides. Every line will reach from end-to-end no matter how few letters or words are on that line. The software you're using will "kern" the letters to squeeze or stretch the text to fill the line.
Sometimes software will do funky things when you try to justify text ... here's a few gotcha's to watch for:
• The last line in a block of justified text will be shorter if there aren't enough characters to fill up the width and justify it. When just a single word is there, it's called a "widow" and is generally frowned upon in the typesetting universe. You'll need to go in and adjust the spacing so that no widows are left dangling all alone.
• If text runs from a column or page to the next column or page, and just a couple of lines or words are at the top of the second column or page, that's also a no-no, and just really looks sloppy. Adjust the spacing so that paragraphs are completed nicely before the next page. (if a good chunk of the paragraph is on the second page, that's okay).
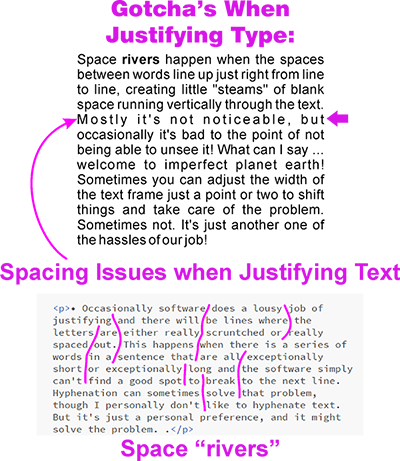
• Occasionally software does a lousy job of justifying and there will be lines where the letters are either really scruntched or really spaced out. This happens when there is a series of words in a sentence that are all exceptionally short or exceptionally long and the software simply can't find a good spot to break to the next line. Hyphenation can sometimes solve the problem, though I personally don't like to hyphenate text. But it's just a personal preference, and it might solve the problem.
• Space rivers happen when the spaces between words line up just right from line to line, creating little "steams" of blank space running vertically through the text. Mostly it's not noticeable, but occasionally it's bad to the point of not being able to unsee it! What can I say ... welcome to imperfect planet earth! Sometimes you can adjust the width of the text frame just a point or two to shift things and take care of the problem. Sometimes not. It's just another one of the hassles of our job!
Kerning refers to the adjustment of the spacing between letters in a line of type or a word. The fonts in software are designed with built-in kerning that is proportionate and correct no matter how large or small we make our text. Most professional graphics software will allow custom kerning adjustments in sections of text or individual characters when needed ... like for Drop Caps, which brings us to the subject of ...
• Paragraphs
Paragraphs help keep both the writer and the reader organized in their thoughts so they can follow the message of the text. Distinquish individual paragraphs either by indenting the first line or with an extra line space between or, on rare occasions, use both.
Indents of the first line of paragraphs need to be not too small nor too large. If too small to be noticeable, paragraphs will run together making the text hard to read. If they are too large, they are tiresome to look at and, frankly, unprofessional and obnoxious! Don't do that!
A good rule of thumb is to make indents slightly larger on running lengths of text, like in novels or in whole pages of text that's not interrupted with illustrations or graphics.
Indents can be slightly smaller or not at all if extra spacing is used between paragraphs.
A hold-over from typewriter days is to simply add an extra line space between paragraphs. This is usually fine for emails, text messages and that manuscript you're sending off, but for professional printed materials (like our books!), a few points of extra leading is all that's needed. Your graphics software will give you the option of adding a measured space – in points or inches – before or after paragraphs. Like indentions ... too little, and paragraphs aren't distiquishable; too much is tiresome for the reader. There aren't any hard and fast rules for this ... when I'm in doubt, I simply go look to see how other people did it!
Drop caps are another nice way to begin a paragraph, but don't overdo it. Typically, a drop cap is only used on the initial paragraph on a page. Or really fancy and embellished on the opening paragraph of a chapter in novels and chapter books.
• And one final note ...
Another hold-over from typewriter days is the extra word spaces after the end of sentences.
In bygone days of secretaries typing out business letters for their bosses to sign, it was standard practice to add an extra letter space after sentences. It made the typed copy easier to read with the mechanically spaced letters of the typewriter, but it was never done in printed materials like books, newspapers and magazines, where the type was spaced correctly by typesetters.
It's just one of those hold-overs stuck in our collective brains ... we do it because we always did it, and we know not why ... Stop it!!


Typesetting Your Picture Book
All of the typesetting in every book needs to be easy to read and needs to fit with the tone of the narrative.
In a picture book, it's not just important, it is an absolute MUST. Text and illustrations need to fit and work together to create the best experience for the reader. Careful planning is the key.
Approach your book layout as one whole unit. It's ONE layout with 32 parts (or however many pages your book has), and NOT 32 layouts!
First, you need to know how many pages will have narrative and illustrations, so count up how many pages you need for the title and dedication pages, author bios, publisher's info, etc. This will usually be 5-6 pages, subtracted from the total number of pages in your book. In a 32-page book, you'll be left with 26-27 pages for story and pictures.
Now decide which/how much text will be on each page. What will the illustrations depict? Will the illustrations be across 2 facing pages? One illustration per page? Will the illustrations wrap around the typed copy? Will the text be on one page and the illustration on the other?
Your decisions will be influenced by how much or how little actual text there is. Some books are heavy on the text with smaller illustrations, or less text and larger illustrations. Some books have no text and are all pictures! Also to consider is the age of your target audience. And how you should layout each spread (2 facing pages) to encourage the reader to turn the page and keep the story moving along.
When text and pictures are all planned out and when you know what's going on every page ... perhaps the drawing has already begun ... it's time to begin selecting fonts for the text. We'll begin with ...
The Body Copy
The body copy is the text that is the narrative of your book. It needs to:
1. Match the tone/mood of the narrative, and
2. Be comfortable and easy to read.
This is not the place to get artsy ... simple is the key, but it doesn't have to be boring either. Just match the tone/mood of the story ... Is it funny? Sad? Serious? Way out science fiction? Historical? Stone age or medieval? Pick a font to match! Just keep it easy to read:
Scripts and novelty fonts, unless they are very simple and easy to read, should be never be used – or at least sparingly used – for body copy. But they can be great touches for emphasis, drop caps, etc. Handlettering or even art will work, especially for drop caps:
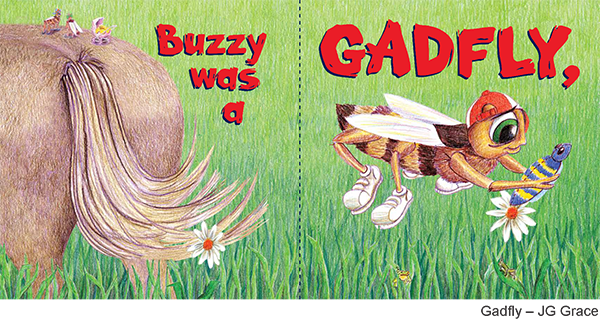
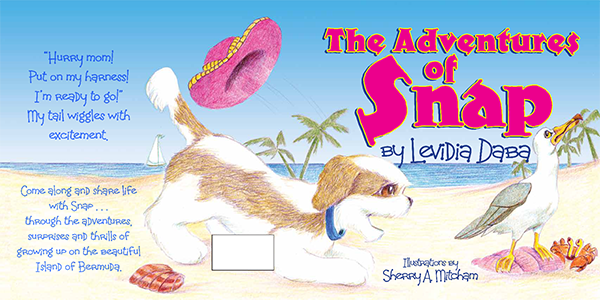
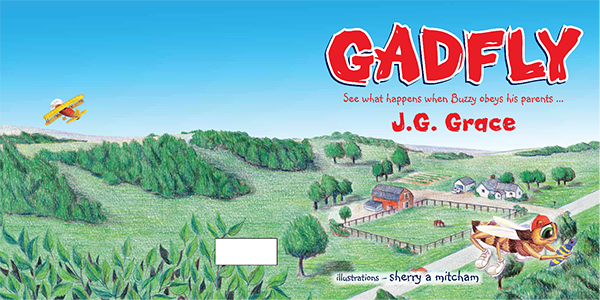
Did I just say that novelty fonts should never be used for body copy? Sometimes, when the text is very simple and fun, you just gotta' break the rules ... like in "GADFLY", by JG Grace:
I like to incorporate text and illustrations together ... 2 elements in the design. Generally I allow a spot for the text and wrap the illustration around that spot.
If you like the illustration and the text on opposite facing pages, that works well, too. Try doing something on the text page to tie it in with the illustration ... with borders, or vignettes or colors that coordinate with the art.
Front and Back Cover Copy
Covers are tricky ... too pizzazzy is chaotic and a turn-off, and not pizzazzy enough is boring and won't get the book noticed.
Must-have elements for the cover are illustrations of the main character(s), title, by-lines, if any, and credits for the author and illustrator. And lots of COLOR!
Use colors and images that reflect the tone and settings of the story. Characters, too, should hint at who/what they are in the story without giving away too much information.
And when it's time to choose fonts, you could, of course, just use headline-sized versions of the font you used for the body copy. The body copy inside the book is almost always black for readability, but here on the cover, make it bright and big in colors that pop and coordinate with the rest of the book.
If you're feeling adventurous, here's the spot for all those novelty fonts you've been wanting to use! Choose fonts that match well with the fonts on the inside. Even if they're not sitting side-by-side on the same page, they'll have the same feel and your book will feel and flow as a unit. You don't want abrupt changes when opening a cover or turning the page. You want the entire book, inside and out to feel like a single, whole entity.
It's easy to go too far ... never use more than 2 different fonts on the cover. 3 at tops, but that's pushing it. Too many different fonts will just look unprofessional and ruin your design. To retain quality, less is more.
I generally like to use the font from the body copy for bylines and credits. The title is either a dressed-up version of the same font, or I'll find a novelty font that goes well with it.
Images for the back cover can be continued images from the front that wrap around the spine and continue on to the back, or they can be entirely separate. If they are separate, let your front cover image continue across the spine and then stop.
Copy for the back cover is entirely optional. It can be a brief synopsis of the book's narrative, a bio of the author, a list of the author's other works, reviews from satisfied readers ... anything goes. Or you can leave copy off altogether.
If you opt for copy, use the same font as the front cover bylines and credits. If it's a substantial amount of copy, maybe dress it up with drop caps in the same font as your title or like something you did with the body copy. You can use the same color scheme as the front or do something contrasting. But make it look like it was designed like that, and not like it's just a hodgepodge of unrelated images.
If you opt for no copy, then add a simple image or extend the image from the front cover. Use colors from the front cover art.
Find out from your printer where barcodes will be placed and make certain that important images in the artwork will not be covered over.
The Title Page
Don't forget the title page!
Once your outside cover is complete, your title page is practically done.
The title page of your book can either be a duplicate version of your front cover, or a simplified version. For sure, you will want to use the same font/arrangement of the actual book title.
Converting Type
When your book is all finished – typesetting and art – it's time to send your files to the printer.
Always, always get the printer/publisher to send you their guidelines for setting up and submitting files for the printing process. Different shops work different ways ... never just assume that you know what they need from you.
Generally they will ask you to "convert all of your type to curves". All that means is that you will change all of the type in your file to art.
Keep your original working file and make a duplicate file and convert all of the typed copy into art.
The graphic below will show you why ... I set up this terrible little graphic on my desktop computer and deliberately set the type in 2 fonts, Tango and Stars, because I knew that I didn't have the font "Stars" on my laptop.
And when I opened the file on my laptop, this is what happened:

When you open a file in a system that doesn't have the required font(s), it will substitue another font, and it won't be pretty!
But if you convert the type to art (or convert to curves, some programs call it), it will open just fine, because there's no typed copy.
Can you imagine what it would be like to have a computer substitute all the typed copy in your book with another font? I promise, it won't improve your book!
The one exception to this is the occasional printer who will ask you to keep the typed copy as is. In that case, you will package up all of the fonts you've used and send them with the print files. When they open the files, if their system substitutes fonts, they will install your fonts on their system ... and that resolves the problem!