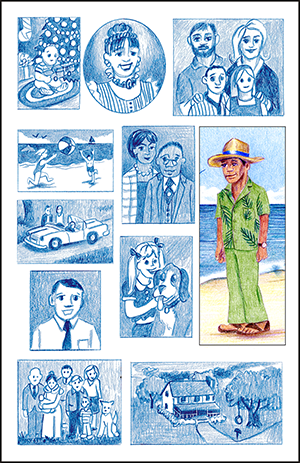
I never actually met him. He was just a nice-looking stranger in a photograph. 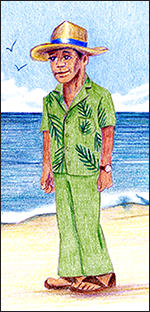 I call him the Caribbean Man because of the way he was dressed: in sage green shirt and pants – silk or linen, I couldn’t say – and a dapper Panama hat atop his brown, handsome face. Here is a rendition from memory of the Caribbean Man. Being an artist is sometimes very convenient!
He could’ve been from Jamaica or Barbados or Kansas ... I don’t know. I only know the pain I felt when I saw his photo ... and I always wondered what thoughts ran through his mind when he saw that photo ... maybe he didn’t even notice or care. But I kind of doubt it!
Here is the Caribbean Man’s story:
Several years ago I was working as a graphic artist in a local digital print shop. A lady came into the shop one day to see if we would print up programs for an upcoming family reunion she was putting together. A standard program, 5.5”x8.5”, 8 pages, saddle-stitched, full color. No problem.
She only wanted to pay for printing, not graphic services. She would lay out the program herself and send it to us print-ready. She was working in Microsoft Word ... what could go wrong? So we told her how much bleed, margins, etc. we needed, and how to format and send us final files. And she actually did a pretty good job!
We prepared her job for the press. We naturally printed a proof first, which she inspected and approved. Then we ran her programs, boxed them up and delivered them. She seemed pleased. I hope her reunion went well. But I was troubled ... though there was absolutely nothing I could do about it ...
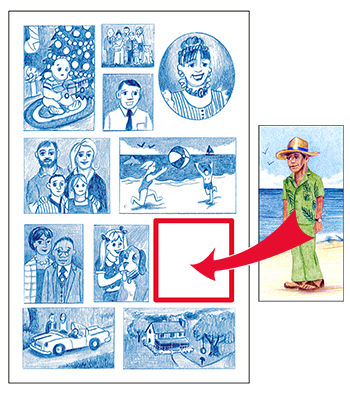
Somewhere in the middle of that program is a page with a montage of photos. Photos of relatives, young and old, alive and passed on, that included the Caribbean Man.
This is how much space she had to put him in:
Now she could have done this:

Or, she could have cropped the photo like this:
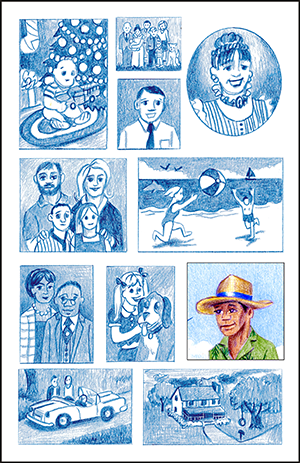
Maybe she could have re-arranged the page a bit like this:
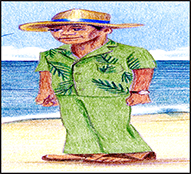
But, nooo ... THIS was her solution:

It makes my heart hurt ... even just looking at a drawing of it ...
So this article will be all about proportions.
Something you may not think much about, but, as you can see, are very, VERY IMPORTANT!!
Sizing Images To Fit
The Caribbean Man's photo was most likely scanned into the computer and saved as a JPG. Or perhaps his image was imported from a digital camera. Either way, let's place him into our page and re-size him...

In any graphics or layout program, you will be able to click on an element or graphic to select it. If it is text, you will be able to insert your cursor into the body of the text so that you can type. If you are clicking a graphic or photo, anchor points will appear around the perimeter of the graphic at the 4 outer corners, and usually the vertical and horizontal centers. See Figure 1.
If you want to simply move the graphic, in most programs you will need to click and hold the cursor on the center or an edge of the graphic - not on an anchor point - and move the graphic.
If you need to rotate or resize the graphic, like our Caribbean Man, the anchor points will do that.
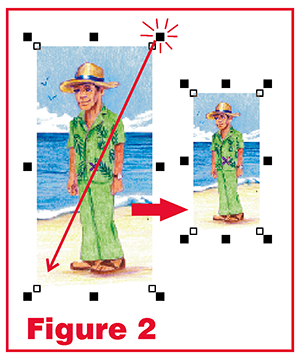
Proportionate Resizing
Figure 2. To resize a photo or graphic proportionately, click and hold a corner anchor and drag it diagonally up or down. In some programs - CorelDraw and Word - the corner anchors will automatically resize proportionately. In the Adobe programs - Illustrator, Photoshop, InDesign - you will need to simultaneously hold the Shift and Control keys while dragging the anchor in order to keep it proportionate.
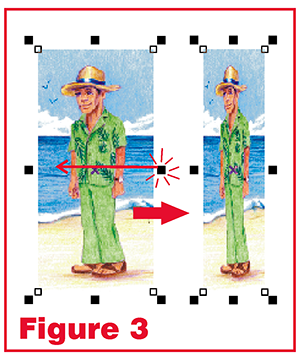
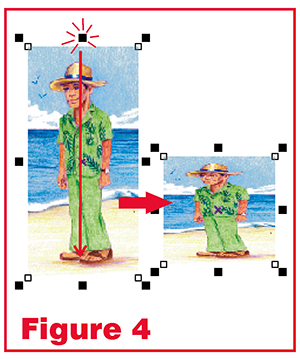
Non-Proportionate Resizing
Figure 3 and Figure 4. To resize a photo or graphic non-proportionately, click and hold a center anchor, on either side or at the top or bottom. Click, hold, and drag it left or right, or up or down. In the Adobe programs, you can do the same thing with the corner anchors, using only your cursor without the Shift and Control keys ... with the advantage of being able to affect both the horizontal and vertical dimensions in one operation.
So Why Does It Even Matter?
Well, I'd suggest scrolling back up and taking another look at our squashed Caribbean Man. What if that was YOU in that photo? I personally hate photos of myself ... I'm not very photogenic to begin with ... but to then add insult to injury and get squashed or stretched ... NO THANKS!
If you think the squashed drawing of our guy isn't so bad, you should've seen the original with a real photo of a real person ... yikes!
Very unprofessional!
We can do better than that.
Understanding Proportions
A proportion is a ratio. If you change the vertical dimension of a graphic, and don't change the horizontal dimension, you have changed the ratio between the width and height. If your graphic was a circle or a square, it's now an oval or a rectangle, and won't resemble your original graphic.
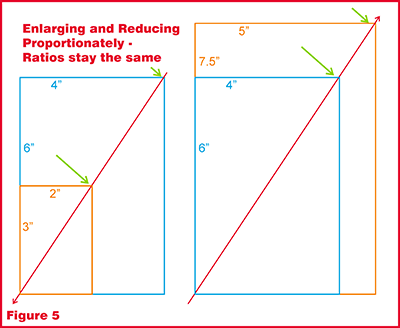
In Figure 5 note the diagonal line from the upper right corner to the lower left corner of a 4"x6" photo. If you reduce the size to 2"x3", or enlarge the size to 5"x7.5", the corresponding corners of the new sizes line up on the same diagonal line. It's because the proportions of a 2"x3" and a 5"x7.5" photo have the same ratio as the 4"x6" photo.
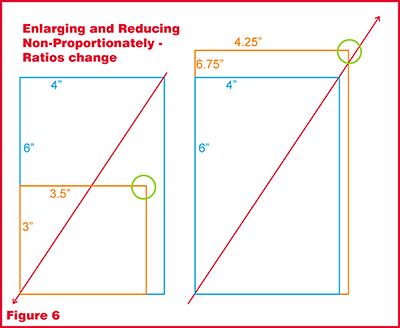
In Figure 6 I again reduced and enlarged the size of the 4"x6". But this time I did it non-proportionally. The 3.5"x3" and the 4.25"x6.75" sizes have different ratios than the 4"x6". Note the green circles ... the corners of the new sizes are not aligned with the diagonal line in the 4"x6" now. This is what happened with the Caribbean Man. The ratio of the height and width of his photo were changed. He might have been 6' tall and 2' wide ... now he's still 2' wide and only about 3' tall! Instead of tall and handsome, he's ... well ... not tall, that's for sure!
Now I can draw empty frames that represent photos and shrink and enlarge them and they don't look so bad. When you have an actual photo, however, whatever is happening to that frame is also happening to the image inside the frame. Sometimes you can get away with it if the size doesn't change substantially, or if it's scenery like ocean or sky photos. But it will show up quickly when working with photos of actual human beings. You'll turn them into monsters! Or make them look like images in those crazy mirrors at carnivals.
Just don't do it! Keep graphics and photos proportionate. Find creative ways to adjust your layout, or crop photos correctly to fit the allotted space you have.
But understanding proportions can be useful in so many other ways besides computer graphics ...
Out of the Computer, Onto the Drawing Board
Understanding proportions can help you draw, too!
You found an old photo of passed-away-long-ago Aunt Imogene in the attic. The photo is 8"x10", and you want to immortalize her in oil on a 20"x24" canvas. I personally would've chosen colored pencil, but, hey, it's your Aunt!
Anyway, I suppose a purist would draw directly on the canvas and just wing it. But maybe you're OCD like me and want to get it as accurate as possible ... let's use a grid.
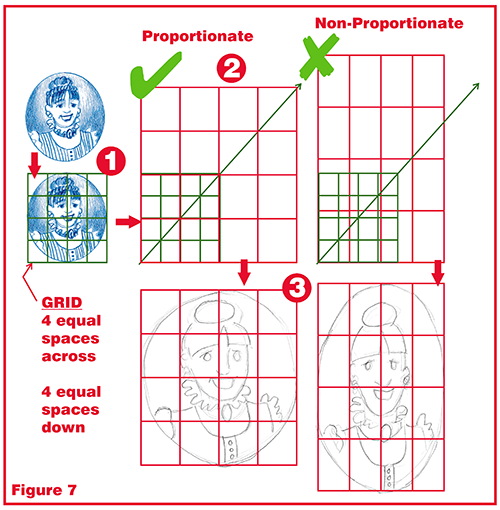
Step 1 Get a sheet of tracing paper and lay it over the photo. Using a triangle and a t-square - this all needs to be very accurate, all 90° angles and straight, parallel lines - draw a box around the outermost top, bottom and sides of your photo. Divide the horizontal and vertical measurements into 4 egual segments and draw lines across both to form a 16 square grid.
Step 2 Get a larger sheet of tracing paper, large enough to accommodate your 20"x24" canvas. Using either your original grid under the tracing paper or re-drawn on the paper in the lower left corner, draw a diagonal line between the lower left corner and upper right corner of your original grid box. Extend the diagonal line up until you've got the right size you need to fit comfortably on your 20"x24" canvas size. Be sure to allow comfortable margins on the sides and top and bottom. When you know where that upper right corner of your new grid will be, draw the right side and top line of your new grid. When the box is drawn, divide both the horizontal and vertical measurements into 4 equal segments and draw lines across both to form a 16 square grid.
If you've done it correctly, the diagonal line will cross every top right corner on every block across the center.
Step 3 Now it's easy to just copy what's in each block in the small grid and draw it in each corresponding block in the large grid.
This is a great way to get the general proportions correct in a drawing. Especially when you are copying something that must be accurate, like a portrait. In my example, I just got the general size and placement of elements in my pencil sketch. Depending on how you work, this general sketch may be enough to transfer to your canvas, or you may want to get it a little more detailed. But your proportions will be correct, and on portraits, you will have a greater chance of getting a good likeness of your subject.
Note how on the non-proportionate grid, the blocks are elongated. The diagonal line doesn't hit all the upper right corners on the center blocks. And when I sketched Aunt Imogene in the non-proportional grid, she's all elongated.
There may be actual circumstances where the distortion won't matter. Perhaps you want your Aunt to be elongated ... like in a caricature. Or perhaps you're painting a mural on a wall, and you have words or graphics that must fit into fixed dimensions ... then you can use this method to get the distortion you want. There are always exceptions and special cases ... never say never!
But, even if you're one of those mavericks who always wants to buck the system ... please ... if you get put in charge of designing and printing programs for your family reunion next year ... just remember the Caribbean Man ...
AND DON'T DO THIS TO YOUR RELATIVES!!! ... even if you don't like them!